Showing posts with label Dragomir. Show all posts

Wednesday, December 14, 2016

Return of the Ma.K - Dragomir's "Last Prayer" Diorama

I have long been a fan of Ma.K (Maschinen Krieger). The time worn historically inspired, anime-esque aesthetic is just cool.

Today I am pleased to present a photo SBS of a Ma.K. build by one of my friends Dragomir Milanovic. Readers will have seen him multiple times in this blog (he even has his own label here!) because aside from being a friend, he is one of the finest and most inspiring modeler's I know.


This piece, entitled "Last Prayer", was something the he picked away at over a couple years in between other projects. I think it is absolutely stunning in its final presentation.

Here (in photos) is how it was made:


The face was a bit bland and uninspiring, and Dragomir had a different direction in mind anyway so a new skull was in order....

A new layer of tattered clothing and equally tattered skin really helped to start setting the tone... 


After some rough/temporary assembly, Dragomir was able to add damage and wear across the suit.


Then it was into casting and carving the background from plaster, model assembly, primer and under painting. Dragomir was the first person to show me salt weathering several years ago - he is still making great use of it!!! (NOTE: You can click on any of these to see them bigger!)

A bit more detailing work and double checking placements for fit as well as shadow and light and it is nearly done! From here he took the following picture and let it sit for a bit to see if there was anything that required significant change before final touch ups.


Whenever you have the option (ie. you aren't painting the night or minutes leading up to a competition entry deadline....but I mean who does that....riiiiiiiight ;P ) this is a really good practice to be in. It is also at this stage having a couple of really critical friends can make those finishing touches so worthwhile.


The finished piece with light cascading through the window in all its atmospheric glory. 
Just awesome!

Back again soon with more cool work (even my own!) to share :)

James TKKultist Craig

Wednesday, May 25, 2016

How to: Realistic Broken Pavement By Dragomir

An amazing tutorial from one of my favorite painters (and a great friend) Dragomir Milanovic!


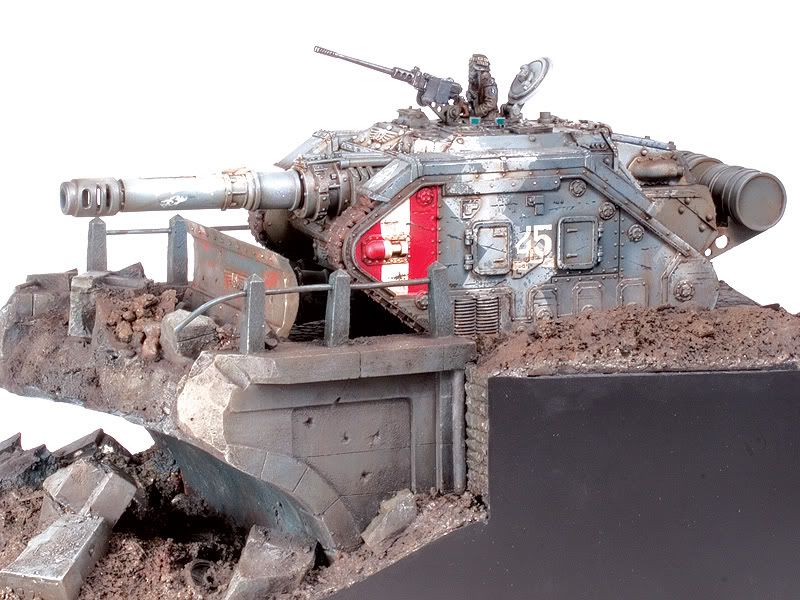
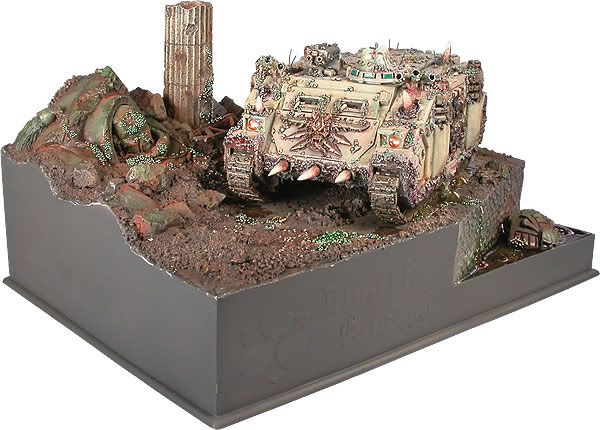
I've had a few requests on how I did the concrete on the PT Sturmgacruiser Fallout base. Hopefully I can fully explain it here.

I used dental plaster for the base. This is much harder than regular Plaster of Paris. Regular plaster has a hardness of about 3000 psi, dental plaster is 8000psi so you can be fairly rough with it, I'll explain later. You can use regular plaster but you have to be a lot more delicate in your work.
Mix the plaster with sand and grit, just think of the scale and avoid larger particles which would be rocks in real like. I added pigment powder to the mix. Since this plaster is cream coloured ( beige ) The pigment used was called Industrial Dust (MIG Powders). You have a dry mixture ready to add water.

Next, you will need to make a mould. You can glue plastic strips to a sheet of styrene. You have to remember that the surface you will work on is on the bottom of the mould so you have to build the mould in reverse. The mould about 1/4 inch deep which makes a bit difficult to pull it out with out cracking but in this case it's ok. If you want a more solid concrete pad with less cracks just make it thicker.


The trick used here to keep the plaster pad from falling apart is to cut strips of drywall mesh tape and embed it into the plaster when pouring. Mix the plaster to a thick creme consistency and pour about half of the mould and embed the stripes of drywall mesh, any nylon mesh will do but drywall mesh if exposed will look like the steel rebar reinforcement which you can see in the above  photo. Pour the rest of the mould and shake and vibrate the mould to get rid of air bubbles. Place the mould on a level surface and take a straight edge, level the plaster to the top of the mould sides and remove excess plaster. Make sure the mesh doesn't touch the bottom or it will be visible when you remove the plaster when viewing the working surface (Bottom surface of the mould).

When dry, remove the plaster base from the mould and have the bottom surface face up, this is your working surface. It should be smooth but it's too smooth now. Place the pad on a surface with some give ( rubber surface ) and start pressing the plaster to form crack patterns. Once happy with the cracks, I mentioned that you will be rough with the plaster, well.....you will need a wire brush, the ones welders use to scrape metal. They can be found at any Hardware store, and a small wire brush which can be found at most Dollar stores in a set. Start brushing the surface in small circular motion. Mix the areas used between the two brushes to give a random patterns. This will roughen up the surface and also expose the grit particles you embedded. You can add water when brushing, this changes the effect the brush is doing because you are making the plaster a tough softer. You can also hammer the surface with the brush to make pock marks and divots. You can see the scratches in the picture .

Once you finished brushing the surface and happy with the effect, you are on to the next violent phase. You will need a small hobby hammer. Yes..... a hammer. That's why I use dental plaster. ;)

If you want old large open crack, start tapping ( Whacking ) along the crack. This will start to shatter the edges and will open up and become wider the more you hammer. It's up to you how far you go. Vary the widths of the cracks, from no tapping to a much as you want. Just keep it looking natural and random.


Once happy, you can apply sand and scale aggregate to some of the large open cracks and use Future as a glue and let dry. I didn't want to use glue because if you have glue residue or smears it will show when you seal the plaster. Seal the plaster with Future Floor wax, either brush it on or airbrush, there is no real difference. Let the Future dry completely.


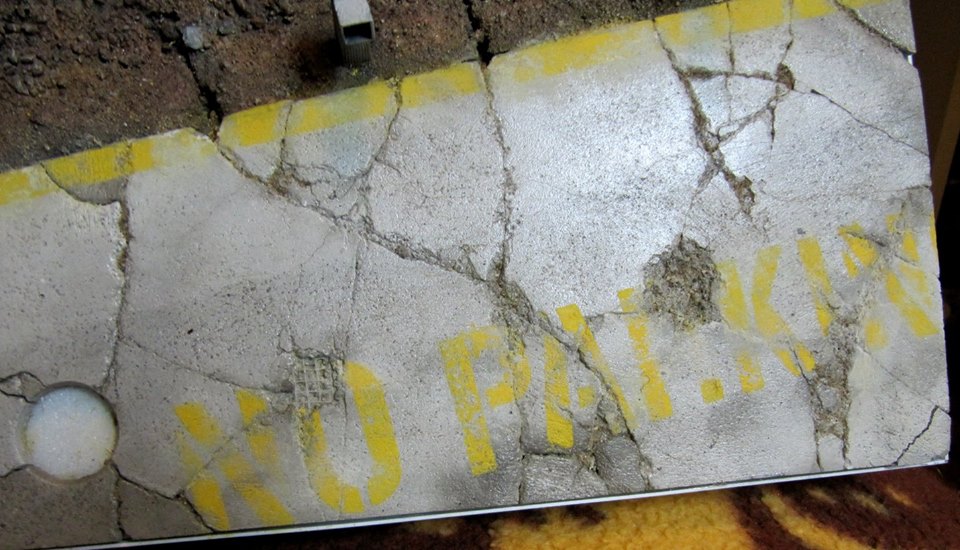
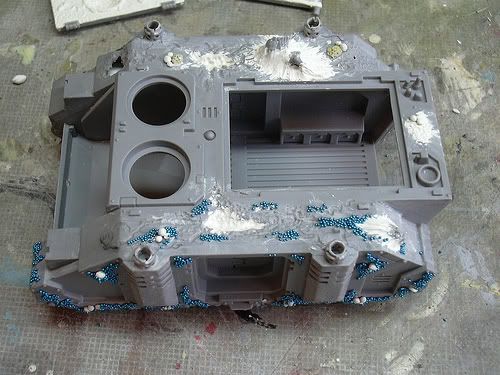
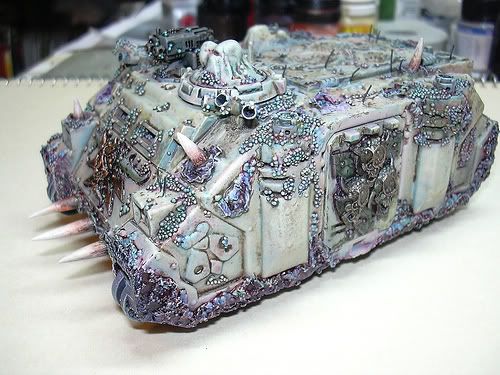
Above the base has been assembled and basecoated. The lettering has been stenciled but not before coarse salt was added to the area. this way once the yellow paint dried it would be chipped and abraded away in a natural looking way by the removal of the salt mask as below.


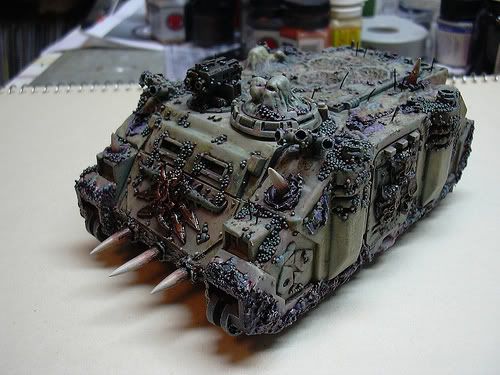
 You can do an oil paint wash at this point. You can either apply it just to the cracks or as I did, over the whole surface. Wait till the wash goes from a wet look to a matte finish, about 30-45 minutes and take cotton swabs and start removing the dried wash from the large surface but leave it on near the cracks and in the cracks. That's how you will get some tonal changes and give the concrete an old earthy tone. Colour is up your preference. If you remove too much, reapply the wash, let dry and do the clean up again till you are happy. Let it dry at least a day and seal it with matte varnish. This should be applied with an airbrush or spray can, I found that brushing can lift the oil pigment and you will end up losing the effects and streak the oil pigments.

 
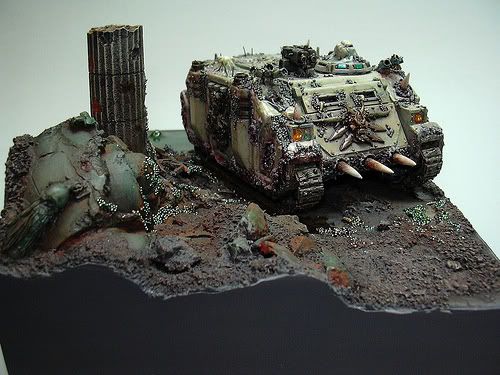
Now it is just in need of some natural groundwork, vegetation, details and debris!
 
(JAMES RECCOMENDS: Check out the documentary Life After People if you want some cool inspiration!)


Birch seeds make excellent leaf litter and there are many types of static grass in both prepared clumps and loose formats. 

James would like to add that there is also the sweet new leaf punch system available from Green Stuff World - I don't have these yet but REALLY want them so that I can punch real looking leaves out of actual leaves!


Hope this was helpful.
Feel free to ask any questions!

Also to see more of Dragomir's work check the tags on the side of the blog page you will see one that links to several postings I have made about his projects :)

Cya Soon!
 James "TKKultist" Craig


Friday, March 14, 2008

TDKOK (The Dragomir Korps of Krieg?) - Dragomir Part 3.


Alright true believers here we are with our next installment of my coverage of the Award winning miniatures of my friend - and all round neat guy - Dragomir!


This was Dragomir's entry for the 2005/2006 Canadian Golden demons. It gets a double date because this was the year where they "reset" the date of the Canadian competition and consequently pushed us past the one calendar year between shows.

It was a heck of a day with some truly incredible models on display. The slayer sword winner was actually one of my all time favorite models - an Ogre Mercenary by LITW friend Jeremie Bonamant. Other highlights included fellow Team North America member Angela Imerie's Beautiful Terminator Librarian (which I thought deserved the gold), Mathieu's incredible Ogre Rhinox (this is the moment I knew he was going to be a truly brilliant painter) and a silver with some beastmen in WFB Unit for myself, your beloved narrator. ;)
aa.jpg ssm.jpg bb.jpg

sbeasts.jpg

And of course Dragomir's entry! While it only recieved a bronze (in itself no small feat as gold and silver went to David Warselynk and Jeremie Bonamant respectively) it REALLY impressed the Forgeworld judges who immediately declared it the FW Best in Show (again no small feat considering Mathieu's Rhinox!!!).

It was really great to see the FW tank designers discussing the refinements Dragomir made to this Leman Russ Destroyer and making comments like: "See thats how I told him it should be done!". They really appreciated Dragomir's attention to detail and very subtle and precise modifications. Here are some shots of the tank building process - and thanks to Dragomir's support and meticulous nature - you can see the whole thing step by step HERE in the galleries.

d1.jpgdx1.jpgdx2.jpg

It should not be entirely surprising to anyone who knows Dragomir that he would excell in building Inperial tanks, as his modelling background really comes out of years of building historical armour and models. I think this really is a large part of what gives Dragomir's work such a unique look and a very different feel than many of his contemporaries.

The thing that I get a great chuckle out of is that so many people in this hobby are reallly just starting to look across to the world of historical modelling as inspiration for developing defferent techniques and looks. This by contrast has been Dragomir's playground for a long time and continues to draw more fans and admirers to his work and a greater than ever number of enquiries into how he creates these fine pieces. I know that I have picked his brain on several occasions about these so called "historical" techniques and will continue to do so for the forseeable future. One great example of this is the "salt mask" technique for weathering that you can see so well in these pictures. After bascoats have been applied salt is applied to the model using a wet brush this is then sprayed over using an airbrush to add the top coats of colour. When the salt is removed it has blocked or "masked" the basecoat - giving the appearance of natural weathering and paint flaking!

dx4.jpg971501945_b735bcdff1_b.jpgdx3.jpg

d2.jpgdx51.jpg


 In our next update you will get to see several of these techniques applied to his monumental 2007 entry and a little further down the road you will get to see what I have been doing with what I have learned from him as I give the world a look at my 2008 Toronto Golden demon entry..... Keep an eye to this space - updates every week.


Friday, February 01, 2008

Dragomir Part 2


Before we get started with this weeks update (which is AWESOME if I do say so myself....) I would like to take a moment to thank all those who tune in each week to this,  my little corner of warp space.  That being said, once my baby comes (any time now!) I intend to make an immediate update regarding that (pics and everything!) and then will not update again until the first Saturday in March as I will be busy helping my wife and newborn. Do make sure you check in though as I will have the third installment of LITW's spotlight on Slayer Sword winning painter Dragomir Milanovic! Until then Here is PART 2:


So welcome back true believers! Today I present two more pieces from the archives of LITW friend and painter Dragomir.

The first of these pieces is his bust of Horus. This started out as the Spacewolf terminator bust from forgeworld but became something totally insane by the time it was finished. The pictures do this model little justice, even so it is a hugely impressive piece of conversion/resculpting work. 


The things that I like the most about it are the lettering done on several of the surfaces and the veining that shows through the thin layers of skin tone on the head. This was actually the inspiration for the similar skin tones and veining on my Alpharius figure (I actually went to Dragomir for advice throughout the building and painting of my figure).


Overall this was a really sweet model which went far beyond the boundaries of the initial core model to become something entirely original and definitively Dragomir's.


The second piece was also pretty special in that it represented something really different for Dragomir in his Golden Demon entries and modelling projects. Where his last 3 pieces had all been large scale models and mostly scratch built/sculpted, his new project was to take an existing GW model - the ubiqquitous Chaos Rhino at that - and to try and put a worthy twist on it.


His work in milliput was a real eye opener for me and through talking to him about it I picked up many useful insights that I still use while sculpting today. The basework was something that I really enjoyed and I have to say that this model stood tall and proud garnering lots of attention in what was arguably the most talked about Golden Demon category of the day. In the end another LITW friend Vince Hudon won gold and Slayer for his entry in the same category (the incredible Magmatrax), Dragomir took silver with this Chaos Rhino and LITW contributor, Slayer sword Winner and fellow Team North America painter Chris Borer took Bronze for his Landraider.


While he didnt get the gold, Dragomir did get the award that he most coveted for the day - the Forgeworld Best in Show. This was a pretty cool moment for him and certainly a well deserved honour.  LOTS of more pics of both of these models including WIP shots can be seen in the Dragomir section of my friends galleries!


COMING SOON: Dragomir Part 3 -More Models! More Awards! AND an Interview with the man himself!