Showing posts with label Terrain. Show all posts

Wednesday, May 31, 2017

ScratchBuild Log Part 5: Final Pics 1915 Curiasse "Fortin" Aubriot-Gabet


So here we are at last and the project was finally done! I am pretty proud of this build. It is not perfect by any stretch but it was a lot of fun and a really new and unique experience for me. I think the finishes on the tank are great and it is a really interesting piece overall.  It won Gold in Vehicle at the Sword And Brush painting competition and 1st place at the local IPMS annual competition. I hope you have enjoyed following the build and if you have any questions do not hesitate to ask!


Thanks greatly to AMMO of Mig Jimenez - this piece wouldn't have happened if not for being thoroughly inspired by the innovative range of products they create. I don't work for them (or any other hobby company) in any capacity but when I see companies like AMMO, Badger, and Happy Seppuku - people who make great things that really ADD to my hobby experience - I don't hesitate to share either! Thanks also to my buddy Trevor Howard for taking these photos for me.

This piece is also on my Putty and Paint page! Id love an extra vote if you are able :)

Tuesday, May 23, 2017

ScratchBuild Log Part 4: Painting the 1915 Curiasse "Fortin" Aubriot-Gabet


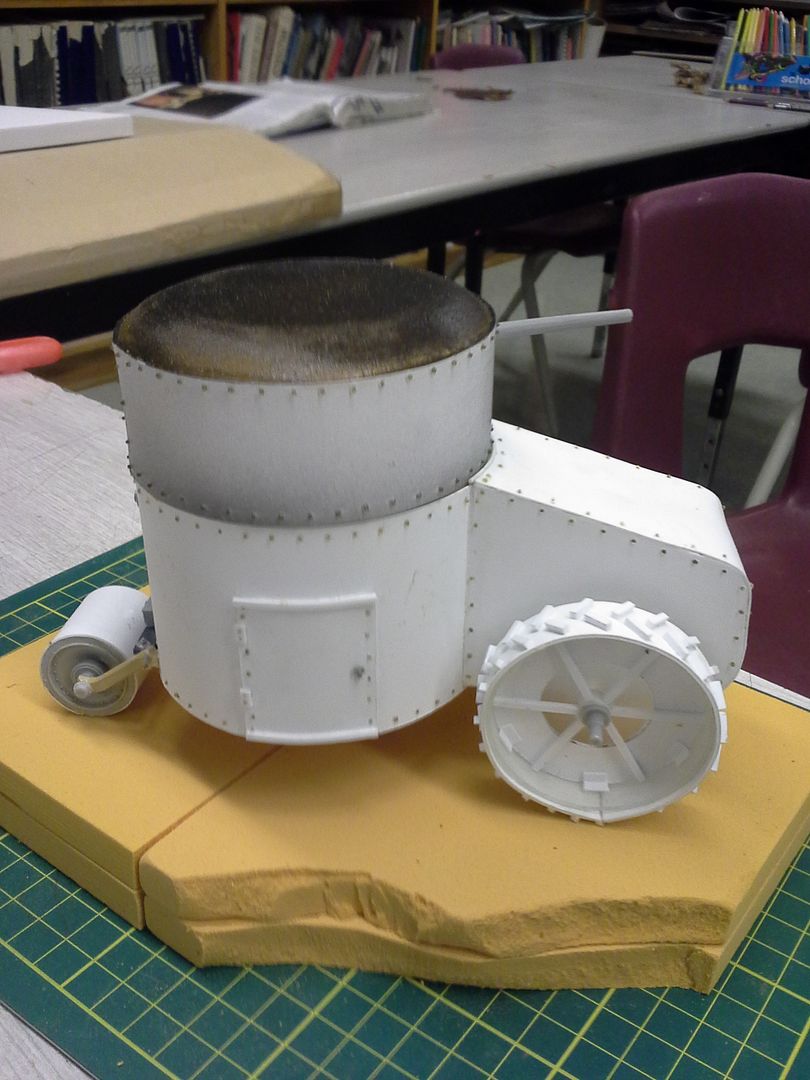
So on to the actual paint! Started with a quick shot of Stynylrez. This primer by Badger is the best I've ever used, though **SPOILER ALERT** Ammo of Mig's new one shot primer is the same formulation made by Badger for Mig!!! Partnerships are something AMMO has really been developing as of late - Alclad being another example - What a great way to get an amazing products into even more hands!!

Once primed I reached for the AMMO by Mig Jimenez 
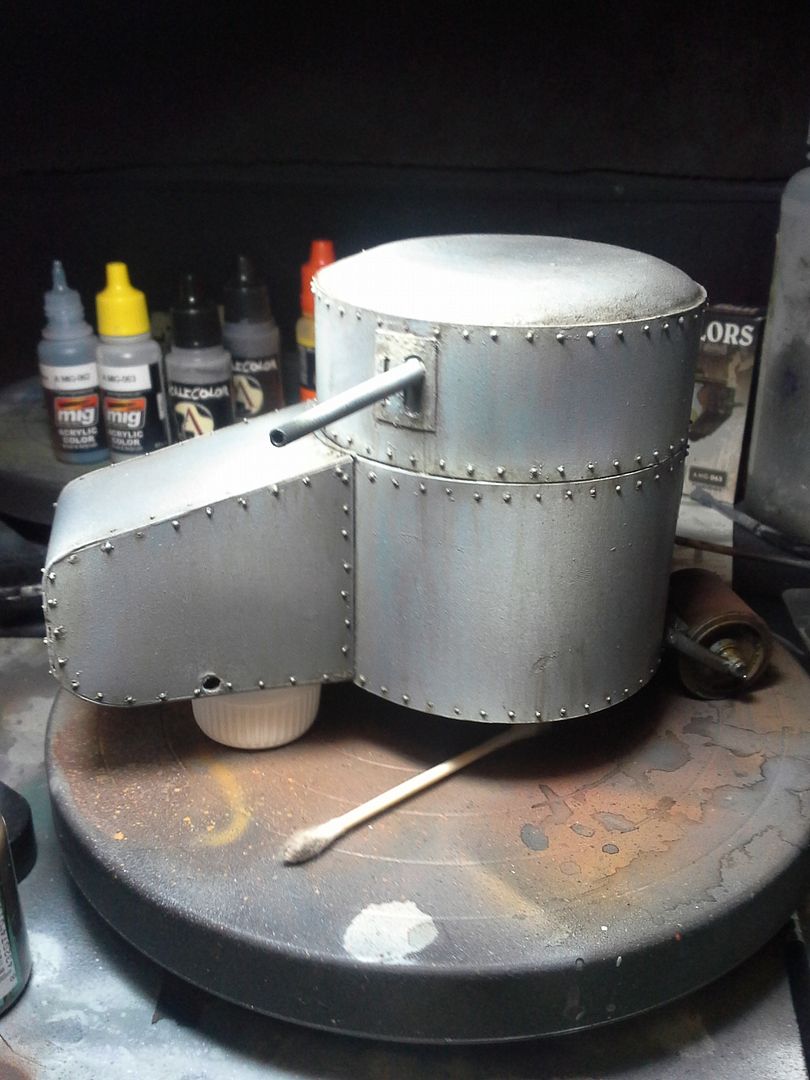
French WW1/2 Camoflage Colours - a great selection of period appropriate colours, but moreso than that a key selection of skewed grey tones - the light french blue was key in this paint job. I also grabbed some VMA German Grey and some Scale Colour Nacar to do some temperature adjusted contrasting zones in the paint job. With this being essentially a monochromatic model it was important to me to use contrasts of temperature and saturation to create interest in the surface of the model. I tried to create exaggerated and interesting areas of light and accentuated form without making it look completely unbelievable. This can be a difficult line to walk in these early stages as the following filters and layers will dramatically adjust these basecoats in a variety of ways. That being said I nailed 90% of my finishes on the first try. Came back the next day and could see what I wanted to change and made it happen. One of the best starts I have ever had on a model! A quick shot of dullcoat sealed this layer in.


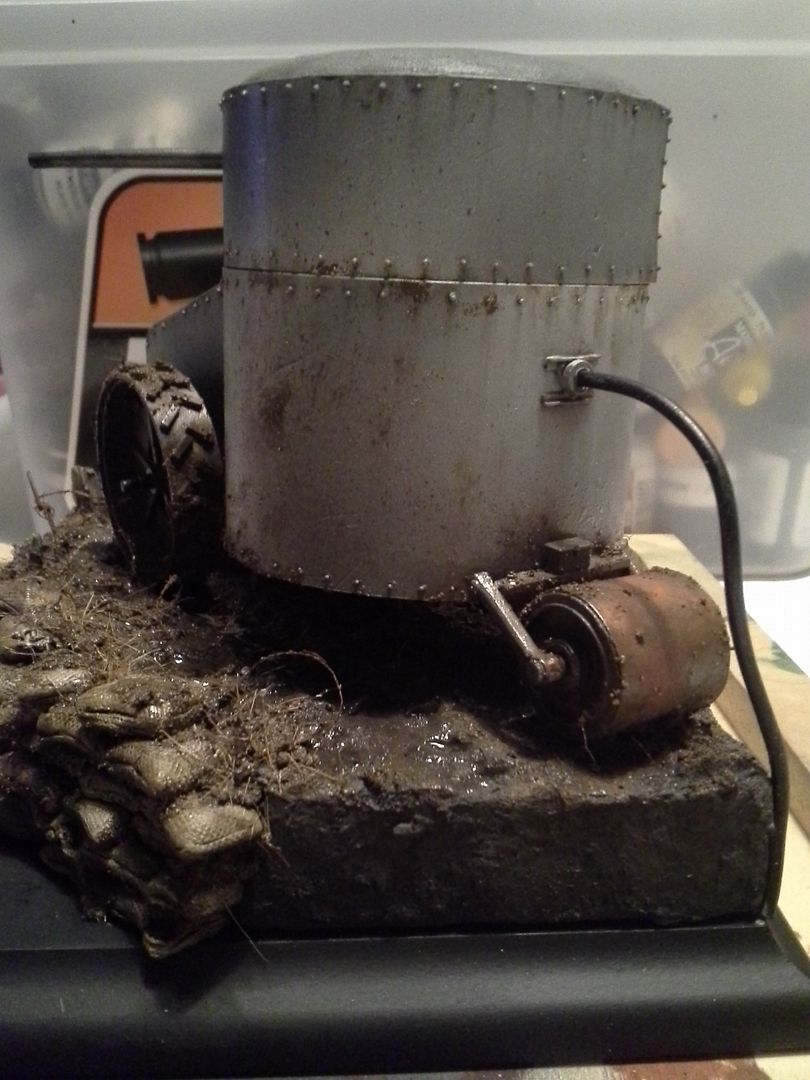
After a little test fitting to make sure all was still properly aligned with the base, the front wheel assembly was removed for separate painting and weathering. I started laying rust tones into the rear roller assembly and then began to apply filters and stains using AMMO of Mig Enamels. Any of my readers will know I love these products and that they have dramatically changed the way I work. Another miniature artist making awesome use of AMMO products is James Wappel - if you don't already follow his incredible mini painting exploits you really should!!!!


While the filters and streaks were drying I started on the wheels where I used a combination of actual chipping with AMMO Chipping fluid and  Layers of paints, enamel rust effects washes and pigments.
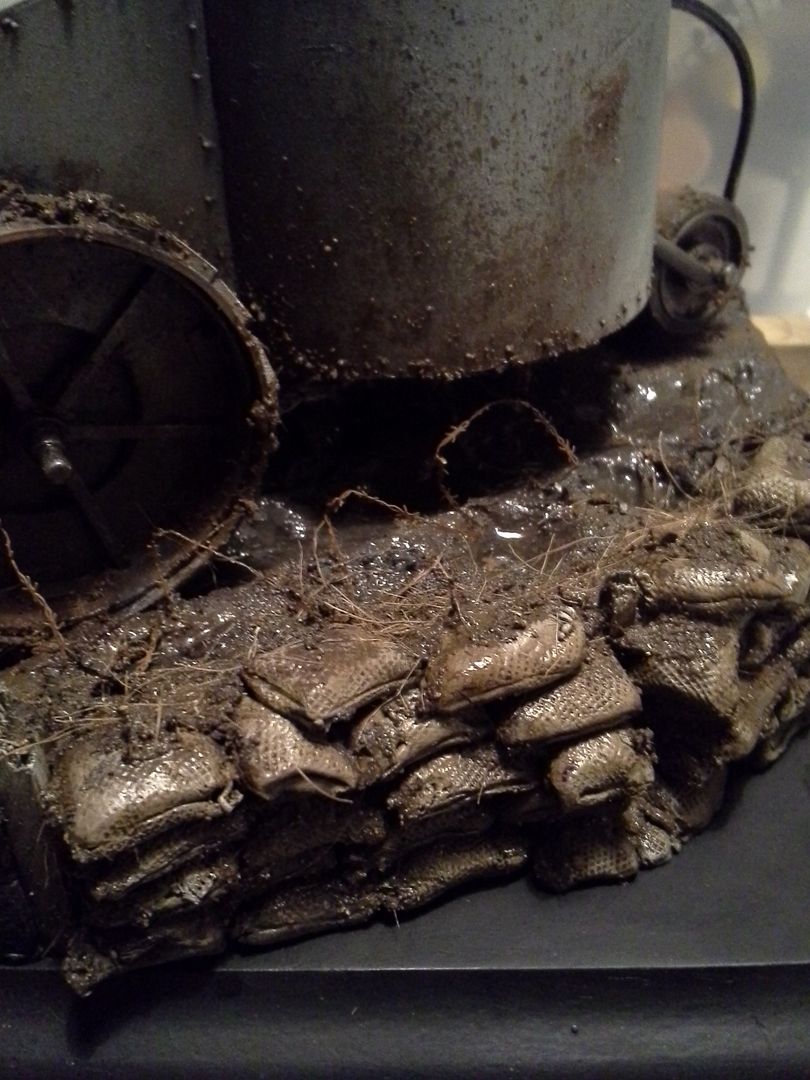
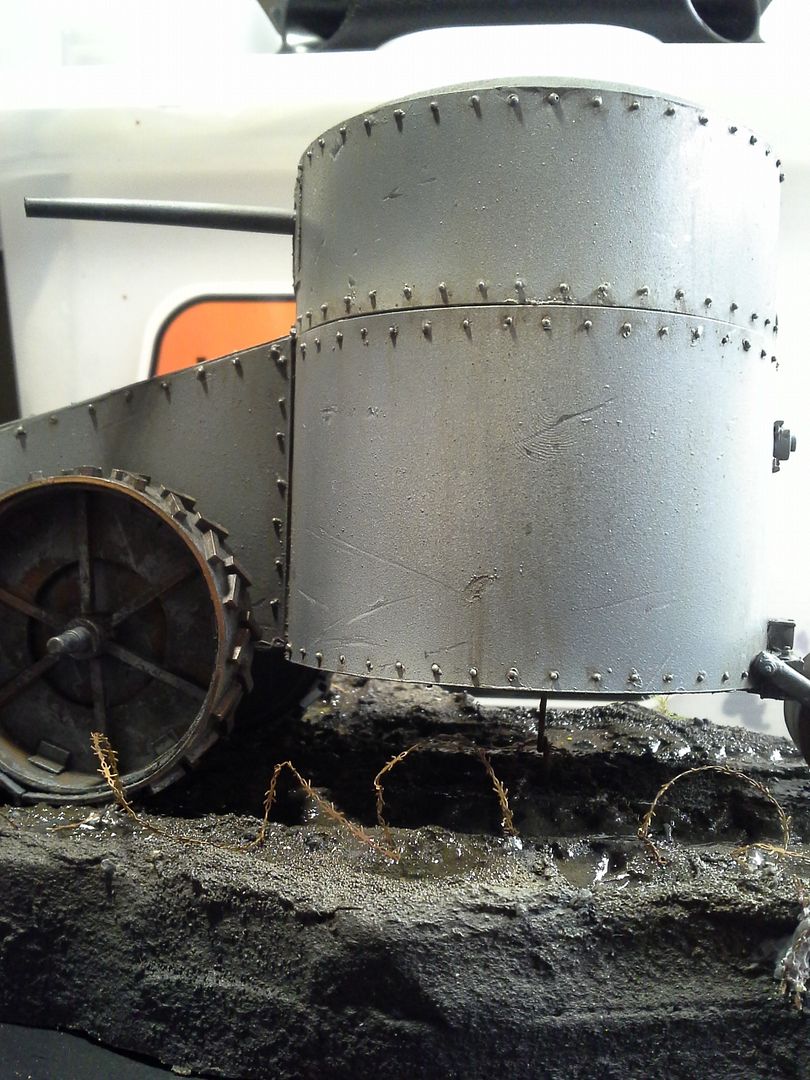
I also used a graphite pencil and Forgeworld Dark Iron metallic pigment to add exposed metal marks and edges. While those were drying as well I took the Forgeworld Barbed wire and began to add it to the base as well. It really added life and interest just as I had hoped - Really pleased at this point with everything!  

Once all the parts had dried it was time for test fitting on the base again


So with that it was time to add more marks and interest across the surface of the hull. Some painters like to refer to this as more "information". Even if (especially if?) it is subtle it really engages the viewers brain more.   Sometimes it can also forward the story element by relating the piece to its environment. As this is designed to drive through barbed wire I wanted to make sure it has many little scratches across the lower hull in particular. These were painted with care and individually highlighted.


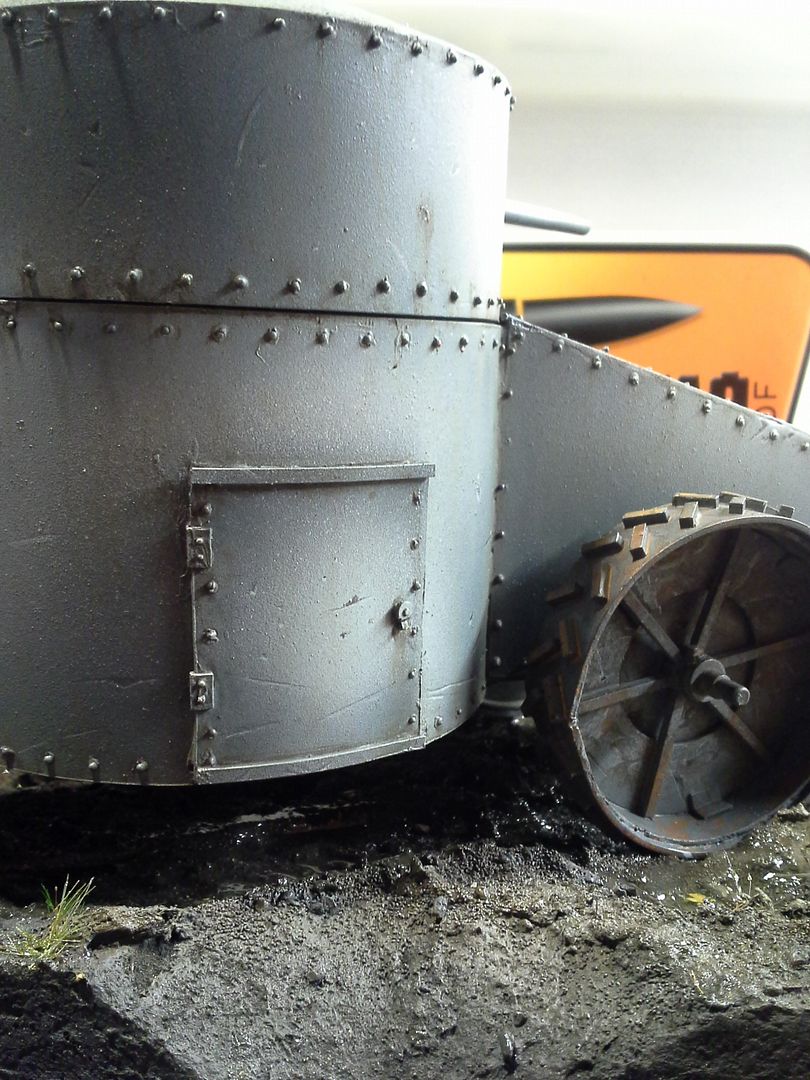
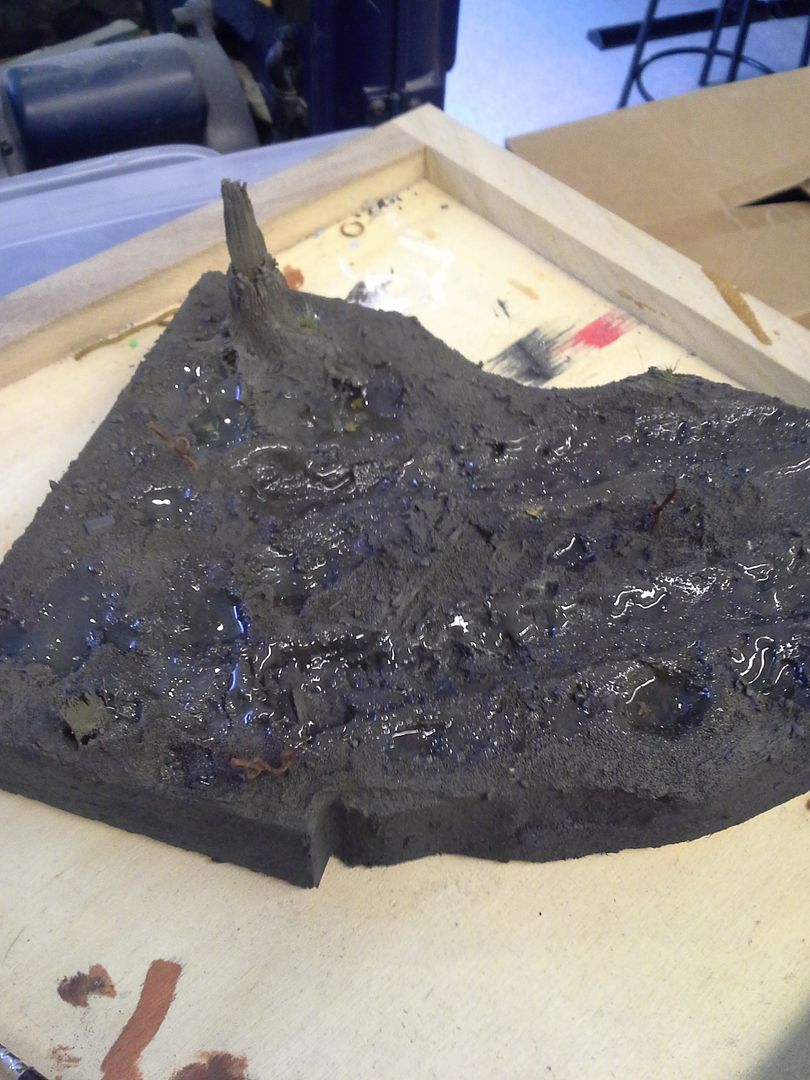
Once I had addressed surface detail and finish it was time for environmental effects - I like to think of my models in layers - Base coat and basic lighting come first. Filters and surface treatments are next. Weather/environmental factors are layered last. So I began by breaking out more of my AMMO of Mig enamels and using them to simulate a first spattering of mud - basically older dryer splashes that would have a matte finish against the slightly satin hull. I loaded up a large brush with the enamel mud and held it near the hull behind the position where the wheel would be. Using the airbrush I shot bursts of air effectively "flicking"  the bristles and giving a natural distribution of spatter across the hull. This was a VERY effective way of simulating the mud and filth that would be spattered by the turning wheels in this wet landscape.


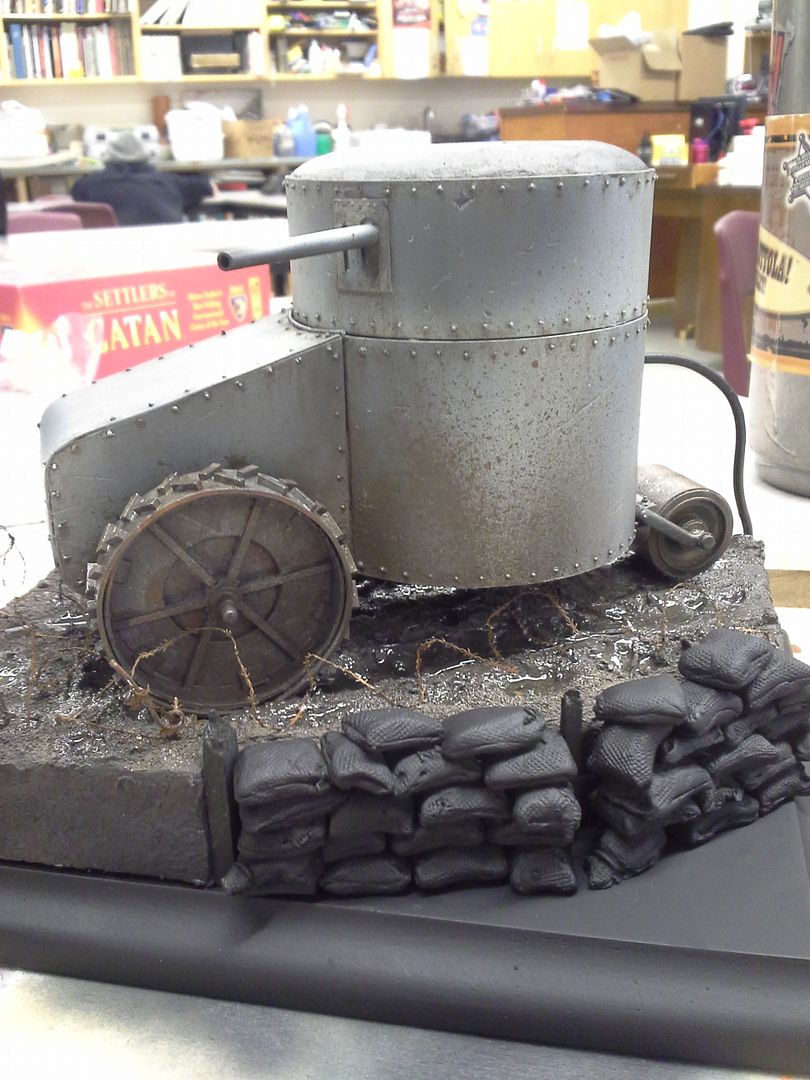
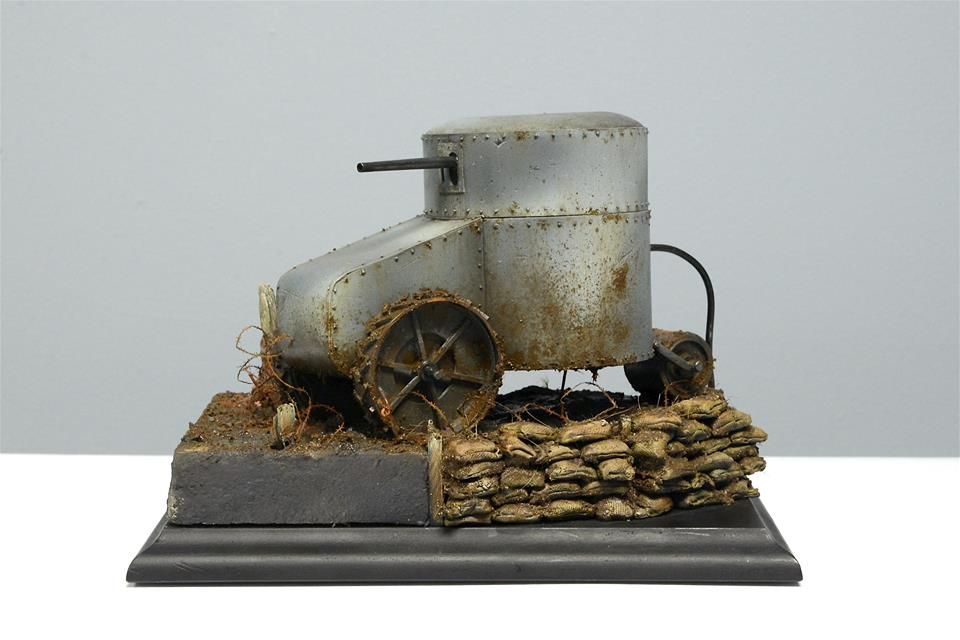
While waiting for this to dry I also attached the extension cord that ran from the back of this wild little electric vehicle back into the friendly trenches (this easily severed and unreliable power source was one of the key reasons cited in abandoning this project after building only the one prototype!).  I also fit and primed the sandbags and supports and began to paint and weather them using a mix of acrylics and enamels. I wanted them to be harmonious with their muddy surroundings to be an accentuating detail rather than a secondary focal point. When finished they help lead the eye into the scene rather than drawing strong attention to themselves. Even the way they are stacked is to emphasize an upward movement pointing towards the tank.

Once the body was dry and the bags were in place I mounted the tank to the base and moved toward final harmonization - making sure it looked as though it was part of the scene and not just placed on top of it. I began by adding the next layers of dimensional mud. Made with pigment, acrylic pigment resin, paint, a little bit of gravel, static grass and some plaster this sticky mess matched the groundwork beautifully. It needed to be applied in stages, however, to build up naturally and to hold the dimension. It was really important to pay attention to the front wheels in this stage and make sure they looked partially sunk/dug in.


As the mixture was built up it was also added to the sandbags and areas of the base with additional roots and plant matter mixed into it - to keep the finish natural and to ensure harmony.


With that it was only a matter of small touch ups and finishes - highlighting the wooden posts, using dark iron pigments and black pigments on the gun barrel and metallic components with Ammo pigment fixer and a few more streaks etc with AMMO rust streaks and track wash. 

Next Week - Finished photos!


Tuesday, May 16, 2017

ScratchBuild Log Part 3: Basing for the 1915 Curiasse "Fortin" Aubriot-Gabet

So now that I had the proto-tank built and riveted, it was time to start working on the presentation base. I started by laying out some rough ideas with scrap pieces of balsa foam and once I had a clear idea in my head I started piecing together the pieces I would actually use.

For compositional purposes I wanted to use a raised piece of groundwork that would help draw the sight lines up and that would narrow towards the wide end of the tank and be wider at the narrow back of it. this would give emphasis to the bodywork and form of the vehicle while still giving me some space to add some landscape details and points of interest. It would also give the impression of forward movement.

As a competitive modeler an a judge, I cant emphasize enough how important good composition and interesting presentation are to separate your work from the competition.


Next up I started to carve into the layers of balsa foam. I wanted to add sunken track marks that would help to emphasise the weight of this contraption as well as to reinforce the nature of WW1 Trench warfare. The Fortin was designed to help cross the muddy shell pocked no mans land - pushing its way through barbed wire and shrugging off conventional small arms fire.  To the right here is a photo I took In France of a section of No Mans Land - even now a hundred years later the effects of the shelling and digging upon the landscape are frighteningly impressive.
Therefore I wanted to include:  Mud, Barbed Wire, Shell damage/craters, evidence of destroyed features from before the war, and a trench line. The tracks and pockmarks were easy to dig in to the balsa foam and then I just sealed them with some PVA foam glue. I took some Bass wood and used it to make some wooden posts, debris and the core of a shattered tree trunk. I built out the rest of the tree and its roots using Super Sculpey. Finally I made some Barbed wire support pigtails like the ones I had seen when touring the battlefields of Europe out of wire.

Next I broke out the Celluclay - a strong powdered paper mache that is great for making textures. I applied a coat of it to the balsa foam to give a real churned mud texture. It also let me smooth out the seams between the layers of foam. This also allowed me to build even greater depth into the surface and imbed the tree so that it looked like it had grown out of the landscape instead of being placed on top of it. I sprinkled some additional sand, small gravel, cork debris, static grass and wooden shards and worked them into the celluclay "mud" so that it all looked cohesive and organically occurring.


With the groundwork established it was time to begin building the edge of the trench line. I wanted to include a sandbag edge like the ones seen at Vimy. I have built these before with great success for a couple projects and find that it is important to build the bags one at a time and detail each because you never can be quite sure what will show. So I treated each bag as its own little sculpture - texture, patches, stitching tears and all. Though it takes a while it is quite fun to be honest. I made sure that I kept setting aside my favorite bags from the others to become the most visible ones where possible.
I made some with apoxie sculpt and some with super sculpey.


The next steps were pretty fun. I broke out a variety of earth colored paints and powders and went to work creating as natural a finish as I could. The photos don't pick up the color variations nearly well enough but I was pretty happy with the overall result. I broke out some AMMO of Mig rust finishes (enamels and pigments) and treated the barbed wire posts as well as some Forgeworld Brass etch Barbed wire. Once the tree, all the wood and earth and scrap had been fully painted I mixed up a batch of Envirotek Lite clear resin and using a medicine dosing syringe and an old brush I added wet effects and puddles to the mud and added a little static grass in both clump/growths and sprinkled into the mud and water


Time to let things sit dry and harden. 
Next week working on the paint and weathering for the Proto-tank itself!!


Tuesday, May 02, 2017

ScratchBuild Log Part 1: 1915 Curiasse "Fortin" Aubriot-Gabet

Here is the build log for my 1915 Curiasse "Fortin" Aubriot-Gabet (Experimental Electric Armoured Vehicle) Scratchbuild in 1/35

Designed in 1915, the Aubriot Gabet “Fortress” was considered as a way of pushing across the dangers of no man’s land. The armoured Body was fitted to a Flitz tractor chassis to provide protection for a crew of 2 (driver and gunner) and featured a 37mm Navy Cannon.
It was electrically powered by an external source which meant a long cable was required to trail behind it as it rolled through the fields of barbed wire and shell craters. This left it extremely vulnerable as any damage to the power line meant that it would grind to a halt.

Only a single prototype was built and tested before it was determined the design flaws were too significant to continue development, and only a single grainy photo of this remains. 
There does not appear to be any company manufacturing a model of this at this time (nor in the past) so it looked like it could be really fun and a chance to finally scratchbuild something!
Since many of the details were not shown in the picture (like the door to get in and out for example!) I looked to other experiments of the era to draw inspiration from - such as the Fahrpanzer rolling turret emplacement.


 I also found this rather handy digital illustration and tiny resin miniature that was being sold on ebay.  Though it was clear that this maker had altered some of the details (like the rear roller mount) and the placement of the door made no sense considering the large electrical cable that is supposed to hang from the back of this vehicle, it was really helpful to see a clear 3-d interpretation of the forms.
  

Finally, I came across a 1/35 paper model that I could purchase the download for $4 !!! Huzzah! This became the basis for my measurements and made the whole process a real treat. If anyone else decides to build one based on what they see here I highly recommend using this as your starting point.

Now it was time to begin scratchbuilding!!!!! Cya next week with details on how :)

Wednesday, May 25, 2016

How to: Realistic Broken Pavement By Dragomir

An amazing tutorial from one of my favorite painters (and a great friend) Dragomir Milanovic!


I've had a few requests on how I did the concrete on the PT Sturmgacruiser Fallout base. Hopefully I can fully explain it here.

I used dental plaster for the base. This is much harder than regular Plaster of Paris. Regular plaster has a hardness of about 3000 psi, dental plaster is 8000psi so you can be fairly rough with it, I'll explain later. You can use regular plaster but you have to be a lot more delicate in your work.
Mix the plaster with sand and grit, just think of the scale and avoid larger particles which would be rocks in real like. I added pigment powder to the mix. Since this plaster is cream coloured ( beige ) The pigment used was called Industrial Dust (MIG Powders). You have a dry mixture ready to add water.

Next, you will need to make a mould. You can glue plastic strips to a sheet of styrene. You have to remember that the surface you will work on is on the bottom of the mould so you have to build the mould in reverse. The mould about 1/4 inch deep which makes a bit difficult to pull it out with out cracking but in this case it's ok. If you want a more solid concrete pad with less cracks just make it thicker.


The trick used here to keep the plaster pad from falling apart is to cut strips of drywall mesh tape and embed it into the plaster when pouring. Mix the plaster to a thick creme consistency and pour about half of the mould and embed the stripes of drywall mesh, any nylon mesh will do but drywall mesh if exposed will look like the steel rebar reinforcement which you can see in the above  photo. Pour the rest of the mould and shake and vibrate the mould to get rid of air bubbles. Place the mould on a level surface and take a straight edge, level the plaster to the top of the mould sides and remove excess plaster. Make sure the mesh doesn't touch the bottom or it will be visible when you remove the plaster when viewing the working surface (Bottom surface of the mould).

When dry, remove the plaster base from the mould and have the bottom surface face up, this is your working surface. It should be smooth but it's too smooth now. Place the pad on a surface with some give ( rubber surface ) and start pressing the plaster to form crack patterns. Once happy with the cracks, I mentioned that you will be rough with the plaster, well.....you will need a wire brush, the ones welders use to scrape metal. They can be found at any Hardware store, and a small wire brush which can be found at most Dollar stores in a set. Start brushing the surface in small circular motion. Mix the areas used between the two brushes to give a random patterns. This will roughen up the surface and also expose the grit particles you embedded. You can add water when brushing, this changes the effect the brush is doing because you are making the plaster a tough softer. You can also hammer the surface with the brush to make pock marks and divots. You can see the scratches in the picture .

Once you finished brushing the surface and happy with the effect, you are on to the next violent phase. You will need a small hobby hammer. Yes..... a hammer. That's why I use dental plaster. ;)

If you want old large open crack, start tapping ( Whacking ) along the crack. This will start to shatter the edges and will open up and become wider the more you hammer. It's up to you how far you go. Vary the widths of the cracks, from no tapping to a much as you want. Just keep it looking natural and random.


Once happy, you can apply sand and scale aggregate to some of the large open cracks and use Future as a glue and let dry. I didn't want to use glue because if you have glue residue or smears it will show when you seal the plaster. Seal the plaster with Future Floor wax, either brush it on or airbrush, there is no real difference. Let the Future dry completely.


Above the base has been assembled and basecoated. The lettering has been stenciled but not before coarse salt was added to the area. this way once the yellow paint dried it would be chipped and abraded away in a natural looking way by the removal of the salt mask as below.


 You can do an oil paint wash at this point. You can either apply it just to the cracks or as I did, over the whole surface. Wait till the wash goes from a wet look to a matte finish, about 30-45 minutes and take cotton swabs and start removing the dried wash from the large surface but leave it on near the cracks and in the cracks. That's how you will get some tonal changes and give the concrete an old earthy tone. Colour is up your preference. If you remove too much, reapply the wash, let dry and do the clean up again till you are happy. Let it dry at least a day and seal it with matte varnish. This should be applied with an airbrush or spray can, I found that brushing can lift the oil pigment and you will end up losing the effects and streak the oil pigments.

 
Now it is just in need of some natural groundwork, vegetation, details and debris!
 
(JAMES RECCOMENDS: Check out the documentary Life After People if you want some cool inspiration!)


Birch seeds make excellent leaf litter and there are many types of static grass in both prepared clumps and loose formats. 

James would like to add that there is also the sweet new leaf punch system available from Green Stuff World - I don't have these yet but REALLY want them so that I can punch real looking leaves out of actual leaves!


Hope this was helpful.
Feel free to ask any questions!

Also to see more of Dragomir's work check the tags on the side of the blog page you will see one that links to several postings I have made about his projects :)

Cya Soon!
 James "TKKultist" Craig


Monday, March 30, 2015

Todd Swanson is SICK! (In a good way)

He may be quite healthy, but Todd's awesome award winning Nurgle models are the epitome of sickness decay and rot.

 I have made no secret that I admire the work of Multi Slayer Sword  winner Todd Swanson - looking back through my blog you may also have seen that he contributed something AMAZING to a special project of mine (check the "With a little help.... " label on the right) that got put on hold for a bit when I moved but which I am looking to return to in a big way this year!

Now Todd is looking to share a bit of his talent and give people some of the very things we have been so envious of all these years. Todd's First offering under the moniker Black Swan Miniatures is a ket to recreate the actual base from his Golden demon winning Mortio Grulgor Model from 2011 (seen here on the right ===> )
 
Yeah, For real.

This base is being sold through our equally amazing friend Chris Borer's FULL BORER Miniatures.

 He has really one upped himself though by offering it as a resin kit with two different base sections and a few extra parts so that you could very easily use it to base multiple hero models for you chaos or industrial style models with some real variety! 

This is intended as the first in a series of releases should it sell reasonably :) I for one SERIOUSLY hope it does because the possibilities offered by Todd's incredible skills and imagination are endless and awesome!


The pieces are super detailed and the casting is crisp with virtually no mold lines. Unbelievably good!

Look to the tiny key on the left hand base if you need any convincing as to how cleanly cast this is.

Awesome stuff - Do check it out, spread the signal far and wide and cheer Todd on! If you buy one of these and use it send me the pics and I will happily show it off here at LITW!

Until next time!