


Just for reference, I HIGHLY reccomend transfers from this company to anyone in search of such things and I will also be selling off my remaining sets of marking from this sheet if any of my readers are interested in making B1 Bis of their own! Just contact me directly tkkultist@gmail.com if you are interested.
I then moved on to weathering the model.
 I worked through several different techniques and stages with this. First I used extremely diluted oil piants to do a pinwash over the whole model. This is a time consuming but very worthwhile endeavour. It involves flowing extremely thin paint around all the raised rivets and details and into all sunken panel lines using a very fine brush (I used a synthetic bristle 00 by Imex and it worked great). This gives everything a weightier look and re-establishes a bit of the contrast that airbrushing can too easily remove from the model. Clean up of any over tinted or sloopy areas was done a little while later with clean mineral spirits.
Following this I went through again with a brown streaking wash for vehicles by AK Interactive and individually tinted additional panels and began the work of creating layered streaks of grime and such along the sides in particular. This stuff is an enamel product and is really interesting to work with. I am really thrilled with how their line of products has been changing the way I work and even the way I conceptualise working. (More on all this stuff over the coming weeks). The basic technique for using it is to paint vertical lines of random length along the vertical planes, leave it to sit and effectively "bite" into the paint beneath for a few minutes and then use a brush dampened with thinner to drag
away excess. This leaves transparent/translucent streaks along the panel surface. Really great stuff!

Once this had all dried I began using a small piece of sponge (pulled from one of my Sabol Design cases) and began to add additional chips and wear to various areas. I used GW Charadon Granite paint because I
really like the flat dark dirty tone it creates. It really gives great effect. I tried to give some thought as to the areas that would recieve the most wear and am particularily pleased with the way this worked out on the top panel near the turret where the crew would come and go but also where I planned to put the "chandail" jacks whose bouncing around would certainly distress things. I also made sure to place some chips across the transfers as well to aid in the distressing effect and to create that crucial harmony.

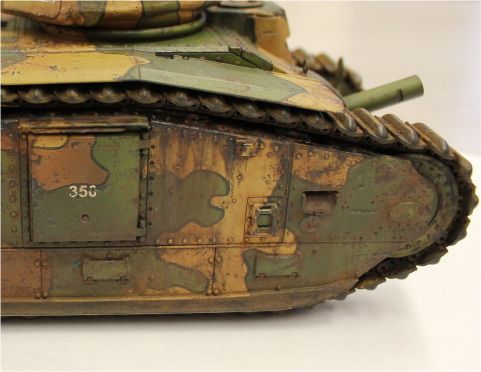
Next up: A description of the dirt and oil streaking along the sponsons/sides, weathering pigments and the tracks!
1 comment:
Nice work! I like that era French tanks
Post a Comment